Do you have a horse with an exceptionally thick mane, such as a Friesian, Lusitano, or Morgan? These horses often require special treatment when it comes to show ring preparations to present a neat and workmanlike appearance to the judge. There are a number of ways to handle a thick mane, but one of the most eye-catching and effective methods is the Double Running Braid. This unique braiding style helps to showcase your horse’s neck, without distracting from their performance. Keep reading to learn more about how to show your horse in double running braids.
Braiding Supplies
Before you begin the double running braid process, you will need to collect your tools and equipment. To double braid your horse’s mane, you will need:
- Step stool, step ladder, or a grooming tote that you can stand on
- Mane brush
- Mane comb
- Mane spray (such as Quic Braid)
- Scissors (the Equi-Essentials Leather Scissors work well)
- A small bucket of water
- Sponge (like the Finepore All Purpose Bath and Body Sponge) or a washcloth or grooming cloth
- Rubber elastic bands (Healthy HairCare Super Bands and Jacks Braiding Bands are popular)
- Waxed Thread; substitutes for waxed thread include yarn (such as Lucky Braids Braiding Yarn) or braiding thread (Equi-Essentials Braiding Thread, for example).
For double running braid purposes, many equestrians utilize rubber bands and waxed thread that match the color of their horses’ mane. However, other horse enthusiasts prefer the look of contrasting rubber bands and waxed thread. Both of these options provide fantastic results — choose the color of rubber band and waxed thread that you prefer.
There are a few differences between waxed thread and yarn. Waxed thread tends to be a bit stronger than yarn, it also has a thick wax coating. This wax coating grips the hair and tends to keep the braid tighter than traditional braiding thread and yarn. Waxed thread is preferred by many braiders for this braid because it can hold the pressure of the heavy mane, however, utilizing yarn or braiding thread can still make for a beautiful braid.
It is also extremely important to make sure that your horse is comfortable with a ladder. You can practice with the ladder prior to braiding your horse, to make sure that the show day is as stress-free as possible. You will want to have a taller ladder so that you are looking down on the mane instead of having the mane at eye level. When you set up the ladder, have the legs of the ladder face toward the front of the horse for safety reasons.
How to Construct a Double Running Braid
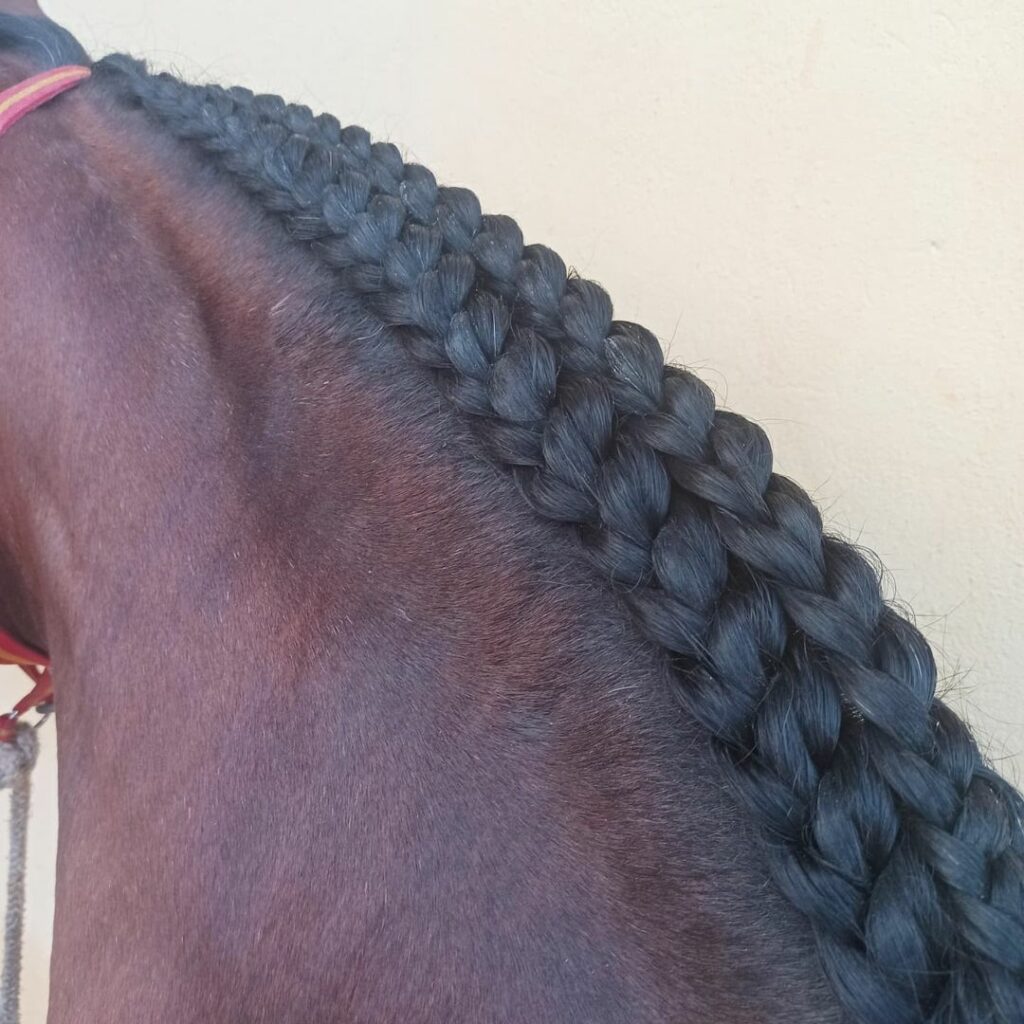
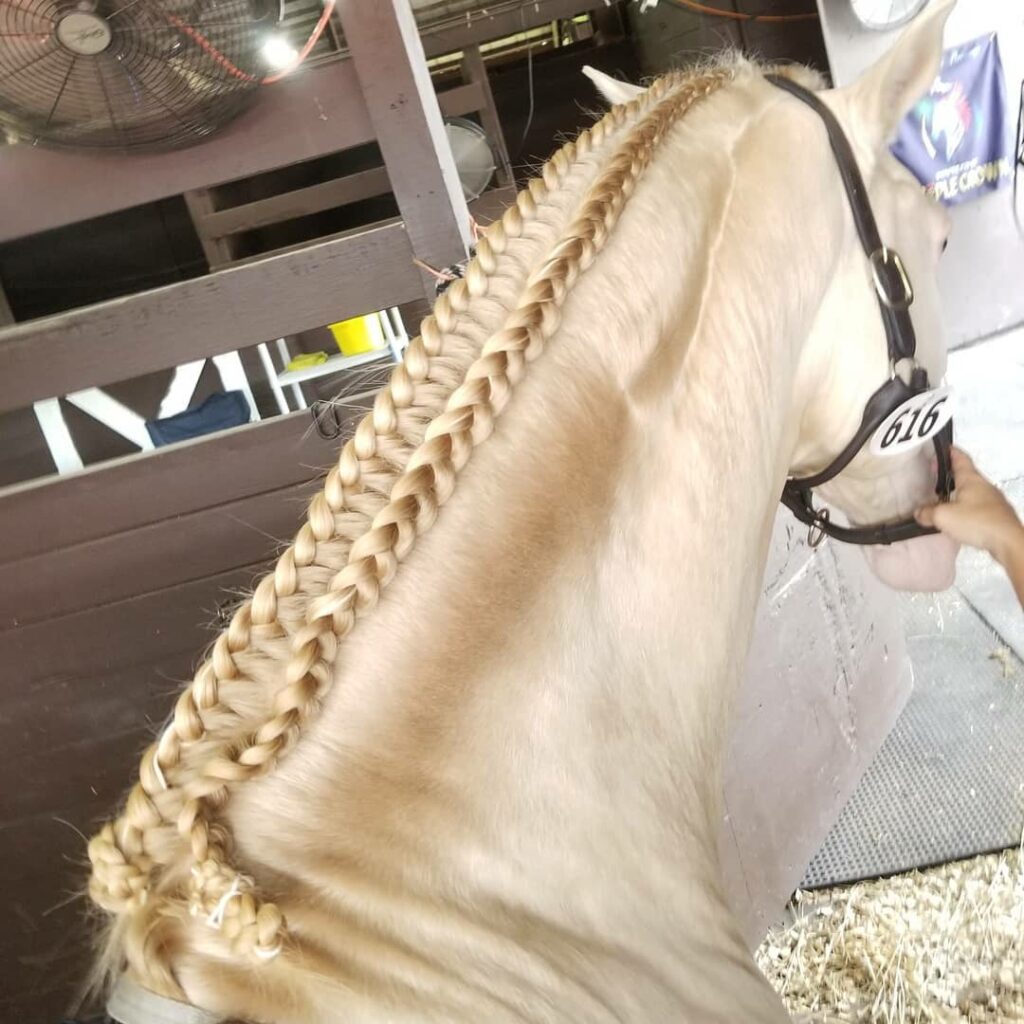
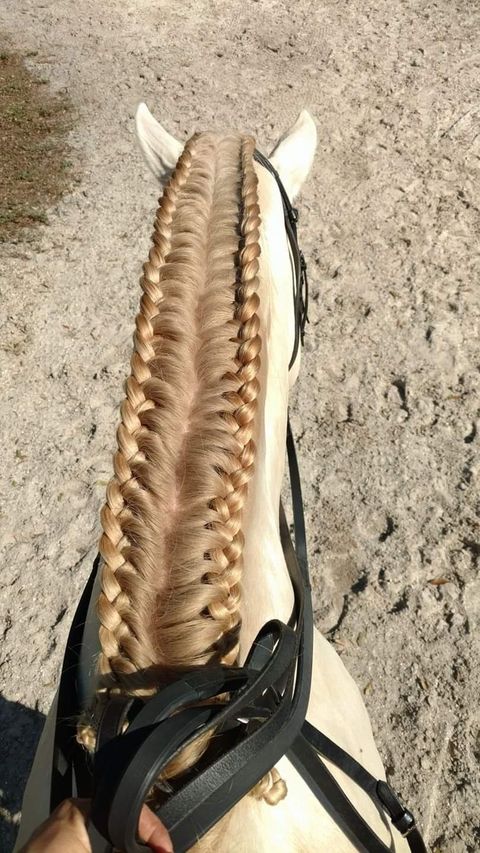
A double running braid looks complicated, but, in fact, it is really quite simple. The key to a double running braid is proper preparation of the mane. Depending on the thickness and length of your horse’s mane, it is helpful to have another person on hand to help you keep the mane organized during this process, especially for horses with extremely thick manes. It is also advantageous if you are familiar with traditional running braids because this braiding style is essentially just one running braid down each side of your horse’s neck. To learn more about running braids, we recommend reading our blog post, Running Braids for Long Manes. Consider shampooing your horse’s mane a few days before you need to braid it because extremely clean and conditioned manes can be slippery. These braids are heavy and your horse can easily stretch them out, so try to braid your horse close to when your ride time is.
- Gather your materials and get your horse comfortably situated before you start to braid. Cut two pieces of waxed thread that are three times the length of your horse’s neck (you will need one for each side of the horse’s neck).
- To begin, thoroughly wet your horse’s mane and the crest of the mane with water and brush it out fully. This is easily achieved by using a sponge or washcloth and a small bucket of water. You want your horse’s mane to be completely soaked; braiding wet hair is much easier than braiding dry hair. If your horse has an extremely thick mane, you may need to repeat the process several times (especially along the crest) in order to ensure that it is completely wet in order to manage the mane and reduce flyaways. Keep your bucket and sponge handy, because you will need to continue wetting the mane after you have split the mane (the next step) and throughout the braiding process.
- Then, you need to part or split the mane down the crest of the neck. Use your comb to run a line down a few inches of the crest to separate it, and then flip one half of the mane over onto the other side of the horse’s neck. It can be difficult to get a straight line at first, but take your time and go slowly through the process (it may take several attempts).
- Secure the split mane on the near side with a few rubber bands to keep the mane organized (we will begin braiding on the right side). You can do this step in the evening (or even a couple of days) before your ride as well, just make sure that you thoroughly secure the mane with rubber bands to keep it split and organized overnight. This is also helpful if you are at a multi-day horse show, allowing you to remove the braid but keep the mane split over the duration of the show.
- After you have split the mane, wet the mane again. Oftentimes the mane is still dry in the middle of the mane for these horses with exceptionally thick manes. Again, you will want the mane to be completely wet. You will also want to keep the mane watered throughout the process, if you have another person there to help you, they can help keep the mane wet as you braid.
- Comb the side of the mane that you will braid first, typically equestrians begin on the right (or the off) side. Take your time again with this process; wide tooth combs tend to be preferred for horses with thick manes. Ensuring that your mane is tangle-free at this stage will make the braiding process easier.
- Mist the mane, particularly the top portion, with braiding spray to make it a bit tackier.
- Think about how you will handle the forelock, you can use a french braid for the forelock or incorporate the forelock into the braid (as shown in the video).
- Separate the area just behind the bridle path, on the right side, into a section about 2 to 2 ½ inches wide, and split it into three equal sections. You may find it easier to use your comb to help separate the sections. So you have a front (right), a middle, and a back (left) section to braid on the off (right) side of the horse.
- Pull the left-most piece of hair across the middle section, and then the right-most piece across the new middle section (just like you would in a traditional braid). By braiding from the left side of the braid first, it helps to keep the braid tight against the horse’s neck.
- Add the waxed thread into the braid, by folding the thread in half; then, separate the fold and lay each side over the right and the left sections of the braid, using your thumb to hold the middle in the cross of the braid (the fold of the thread will go in the cross of the braid). The waxed thread will help to keep the braid in over the duration of your ride and will help to take the pressure off of the mane and the crest. The waxed thread will now become part of the braid and will travel with these two sections of mane.
- Cross the left section of hair (with the waxed thread) over the front of the middle section of the braid. Before crossing the left section over the middle section, use the comb to section off an additional ½ to 1 inch portion of mane on the side you are working on (directly next to the left-most section) and add it to the left section of the braid. It may be helpful to have your helper section off the mane and hand it to you, brushing the mane out to keep it knot-free and organized. Then, cross the left section (with the waxed thread) in front of the middle. Make sure that the waxed thread stays integrated into the braid as you work down the mane. Then, cross the right section of the braid (with the wax thread) across the middle section. Many manes are thinner at the top of the horse’s neck, near the forelock, so you may need to take thinner sections where the mane is thicker to keep the braid even to the eye as you work your way down the neck.
- Continue working down the horse’s neck, adding in more hair every time you make a twist with the left-most section, keeping the braid as tight to the horse’s crest as possible. Make sure that you are only selecting mane from the side of the neck that you are standing on. Keep the waxed thread incorporated into the braid as you continue the process. If you have another person there, it can be helpful to have them section out the next pieces of mane so that you can keep the braid tight and the mane organized. Make sure that you pull the braid back against the neck and the center part, instead of pulling down because the action of pulling down will loosen the braid. Pull tightly after each additional piece of mane to keep the braid snug and tight. The tighter the braid, the cleaner appearance it will make.
- Braid down the mane to the front of your horse’s withers (this will keep the braid from pulling and keep your horse comfortable, especially under saddle). Remember to tightly hold your place on the braid as you step down to move your ladder as you work down the neck. The braid can loosen very easily during the process.
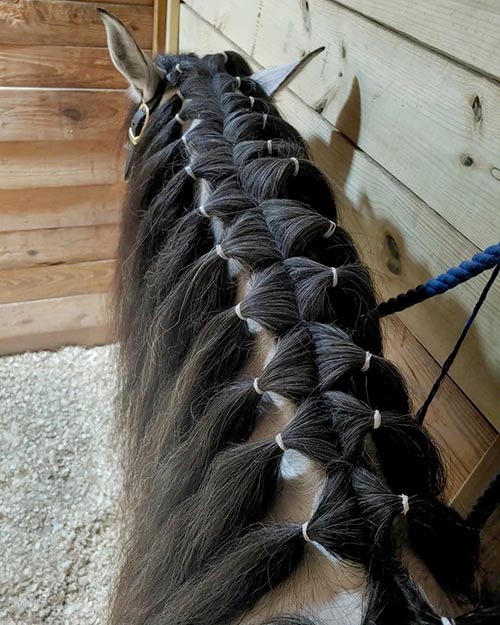
- Once you have reached the end of the crest, braid the remaining mane straight down, so that the entire mane is captured. Secure the end of the braid with a few rubber bands (Pro Tip: In hot weather, keep your rubber bands in the refrigerator to keep them from melting together and to keep their elasticity). You can also use the end of the string to tie the braid up at the end.
- Fold the braid in hand and secure it with another rubber band. Depending on the length of the mane, you may need to fold the braid a few more times to keep the braid neat and tidy. Then, use your scissors to snip off the excess yarn. Be generous with the number of rubber bands that you use to hold the braid tightly.
- Move your ladder to the other side of the horse (the offside), and brush the remaining half of the mane. Wet the mane thoroughly again before starting to braid.
- Begin on the other side of the mane, repeating the process. Make sure that you continue to take small chunks of hair each time you add to the right side of the braid for this side of the neck. Work down the length of the neck systematically, working to create a double image of the other side of the neck. Be sure to analyze how you are braiding, because your hands will have alternate functions on this side, so it may be difficult to keep the two braids looking identical. This takes practice to make perfect braids.
- Step down and admire your hard work! This is a gorgeous (and somewhat time-consuming!) braid.
For further information and clarification on how to perform a double running braid, we recommend watching this step-by-step video tutorial. The best way to learn the braid is through repetition, so consider watching the video and then rereading the instructions above.
For a horse with a thick mane, a double running braid is an ideal way to contain their mane for the show ring, without needing to pull the mane or shorten it. It provides a stunning presentation for the judge, while also staying within the traditional guidelines of the sport. If you have questions regarding the double running braid or would like assistance building your braiding kit, we invite you to speak with a member of our friendly and knowledgeable sales staff.