When competing with your horse in dressage, hunter, in-hand, and equitation classes, it is traditional to braid your horse’s mane to showcase their neck carriage and present a polished turnout. For horse breeds with long, luxurious manes, such as Friesians, Lusitanos, and even Halfingers, a diamond braid can organize the hair, while also providing a striking look in the show ring. Also referred to as a continental braid, a diamond weave, or a woven mane, the diamond braid creates a lattice-like pattern with the mane. It may look complex, but the process is simple and easy to master.
Tools and Equipment
Before you begin the diamond braid process, it helps to collect your tools and equipment. To perform this braid on your horse’s mane, you will need the following:
- Step stool or a grooming tote that you can stand on
- Mane brush
- Aluminum pulling comb
- Mane spray (such as Quic Braid or Mane ‘N Tail Spray N Braid)
- A small bucket of water
- Stiff brush
- Rubber elastic bands (Healthy HairCare Super Bands and Tail Tamer Slick Bands are popular)
- Hair clip (optional but very helpful)
You can choose a rubber band color that matches your horse’s mane or a color that contrasts with it (for instance white bands on a bay horse or black bands on a gray horse). Keep in mind that contrasting bands will accentuate your horse’s neck as well as your braiding job, so matching bands are recommended for beginners or horses who have an unsteady connection in the bridle.
A How-To-Guide for Diamond Braids
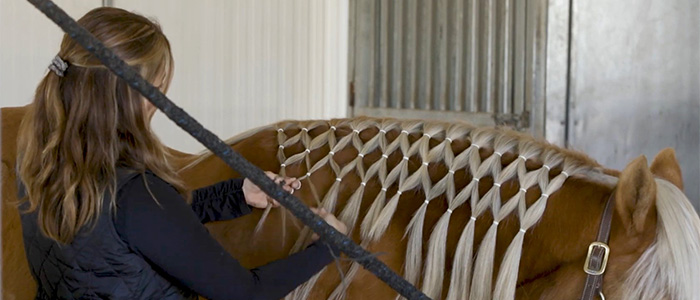
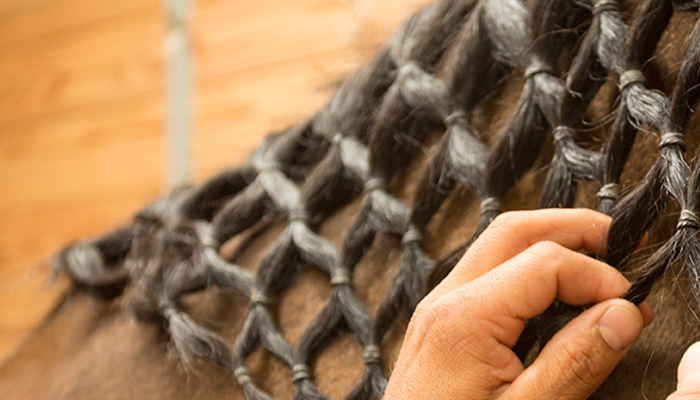
A diamond braid is a simple way of organizing your horse’s mane with rubber bands — it isn’t actually a braid at all! While the process is fairly straightforward, it will require practice in order to master and perfect it. Stay the course and you will be able to quickly and efficiently diamond braid your horse’s mane.
- Begin by brushing your horse’s mane and ensure that there are no knots in the hair and that it’s all falling on the same side of your horse’s neck, preferably the left. Then, using the bucket and a stiff brush, thoroughly dampen your horse’s mane. This step helps you to keep the diamond/lattice pattern neat and tidy.
- Spray the top section of your horse’s mane with mane spray and brush it through your horse’s mane. The spray will aid in your grip on the hair and help to prevent flyaways.
- Starting right next to the bridle path, section off a piece of hair using the comb that is approximately one inch wide across the crest. You may want to use the hair clip to hold back the remaining mane. Pulling the hair down, secure a rubber band about 1 ½ inches from the crest. Continue down the horse’s neck, creating small ponytails of equal size. Focus on making the ponytails in a downward motion so the mane lies flat against the horse’s neck, and keeping the rubber bands in a straight line in relation to the crest of the neck.
- Then, return to the first ponytail that you made. Divide the second ponytail into two equal pieces, then combine the first ponytail with half of the second ponytail. Secure this new ponytail with another rubber band, about 1 ½” -2” from the first row of rubber bands. This will create your first diamond/lattice pattern.
- Take the remaining half of the second ponytail and combine it with half of the third ponytail. Fasten with a rubber band, focusing on keeping the rubber bands in a straight line in relation to the row of rubber bands above it. Continue moving down the horse’s neck, combining the section of the ponytail with half of the adjacent ponytail, until you reach the withers; you will want to leave the area under the saddle undone to reduce the tension in their neck. Then, combine the complete last ponytail with the previous section, just as you did in the beginning of the row.
- This has created your first row of diamonds. Step back to admire your handiwork and confirm that all of the rubber bands are in a straight line.
- Continue the process of adding new rows of equally spaced diamonds until you are pleased with the lattice effect. Some horses look best when the diamond braid is done to the very bottom of the mane, while others present a very striking appearance with only a few rows of diamonds. Choose the option that appeals to you, while showcasing your horse’s conformation and way of going in a positive manner. If you choose to only do a few rows of the diamond pattern, brush out the remaining mane to make it sleek and beautiful. The bottom of the diamond braid will look like small ponytails or flowing locks depending on how many times you repeat the diamond pattern.
For a visual demonstration of the diamond braid, we recommend watching this helpful tutorial from our friends at Breyer Model Horse. We carry the Breyer Sunset Styling Head and the Breyer Daybreak Styling Head, as well as a line of plush toys with braidable manes called Crafty Ponies, if you would like to practice your diamond braid as they suggest.
Addressing the Forelock
After diamond braiding your horse’s mane, you have several options. Many equestrians choose to brush out the forelock and leave it free to maximize the impact of their horse’s dramatic mane. Others chose to band the forelock, to keep the hair neat and organized. Both options look stunning and provide the finishing touch on your show ring turnout.
At The Cheshire Horse, we carry everything you need to diamond braid your horse’s mane at your next horse show, parade, clinic, or exhibition. If you have any questions regarding the process or building your braiding/banding kit, we encourage you to reach out to a member of our friendly and knowledgeable sales team.
Rubber bands can be used to easily organize your horse’s mane into a diamond braid, which isn’t really a braid at all. Although the procedure is pretty simple, mastering and perfecting it will take practice. Keep going, and you’ll be able to diamond braid your horse’s mane swiftly and effectively.